
A taste of Morocco
Moroccan food - I somehow fell in love with it sometime around ten years ago, and I'm not really sure why. This was possibly sparked from Momo in London, hidden off in the little nook that is Heddon Street - a beautiful restaurant with elaborate use of deep and contrasting colors, designed with the familiar Islamic arches and intricately designed lanterns and various other extravagant decorations, made comfortable by plush pillows and velvety fabrics.
 |
| ...not to mention this great statue |
This intrigue of Moroccan food and culture was probably then amplified by Kasbah in Berlin - designed in the same authentic manner as Momo - design that oozes allure and secrecy, and has that exotic charm. At the beginning of the meal, a man comes around with a warm teapot of rosewater to wash your hands with - a traditional start to any Moroccan meal. It was here where I tried my first bisteeya - a sweet, savory pastry that stimulates every tastebud, olfactory, and gustatory sense at once. In Paula Wolfert's words:
"Bisteeya is so intricate and so grand, so lavish and so rich, that its extravagance always reminds me of The Arabian Nights. the traditional bisteeya of Fez is an enormous pigeon pie never less that twenty inches in diameter. Beneath a perfectly crisped pastry top covered with cinnamon and sugar, are layers of shredded squab or chicken, two dozen eggs curdled in a lemony and spiced onion sauce, and sweetened almonds. The whole is enclosed - top, bottom, and sides - in miraculous, tissue-thin pastry leaves called warka.
Bisteeya is a totally Moroccan delight; it is not found anywhere else in the world. For me everything great in Moroccan culture is represented in this extravagant dish."
I couldn't describe it better myself - and this is the perfect example of Moroccan cuisine over history and the influence of various cultures: the mixture inside is reminiscent of the Berber bestila, which is chicken simmered in butter and saffron; stuffing this mixture into a pastry came about when Arab invaders introduced trid, which is a thicker pastry than warka; finally, warka came into the picture and was substituted for the trid - it is made in the exact same way as Chinese spring roll skins, which was passed on to Moroccans from Persian invaders, who also brought along with them ice cream and sherbets. From there, the Moroccans added their own touch with the lemony eggs of Tetuan, and the sweetened almonds from the Souss, resulting in the final delicious product. It's been noted that the delicate pastries traveled from North Africa to France (tourtiere and millefeille), Central Europe (strudel), and even Italy (millefoglie and sfogliatelle). Not a bad cultural map for one little dish!
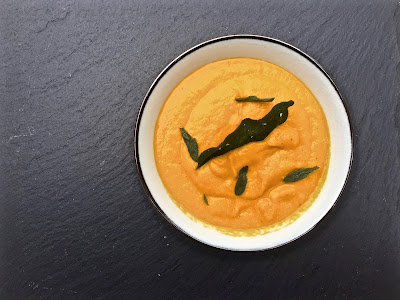
My second revelation came with a taste of Harira, a thick, peppery and lemony soup with tomatoes, cilantro, parsley, chickpeas and spices, served with dates and more lemon on the side. Unbeknownst to me at the time, this soup that is traditionally eaten by Moroccans at sundown each day during Ramadan for "breakfast" with dates, mahalkra (honey cake) and coffee. But, this soup is so tasty, people can't help but eat it throughout the year. It was some of the most addicting soup I'd ever had. The meal was finished with some carrot salad with orange blossom water, tajines, cous cous, and delicious Moroccan mint tea. Everything about the meal was so delicious, that I knew I had to learn about and start cooking my own Moroccan food -that is where Paula Wolfert came in. I bought her book Couscous and Other Good Foor From Morocco - published in 1973 after her many trips to the country. It still remains one of, if not THE best representation of authentic Moroccan cooking. I could read this book front to back every day.
The recipes in this book are outstanding - all full of flavor from the spices used, slightly time consuming (but worth the wait), and completely authentic. It's from this book that I learned how to make traditional Moroccan couscous - none of this five-minute, pre-cooked malarkey that people just view as another grain, but the hour and a half process that involves steaming the couscous over some simmering concoction, removing it and rolling the grains in your oiled hands to separate any clumps, and repeating, creating one of the most texturally exciting, moist, and flavorful grains. Couscous is the national dish of Morocco - it is always served at special occasions. At weddings, the bride separates the couscous between her husband's family and her own, symbolizing the sharing of happiness. It is also served at the end of ridiculously lavish, grand feasts to ensure that no one goes home hungry - similar to the serving of white rice after a Chinese feast.

Then come the dishes cooked in tagines! Anything stewed or simmered is made in a tagine - that triangular, ceramic vesicle I'm sure you've seen before. The design of the tagine is what makes it special - the steam rises up, creates condensation on the sloping sides of the tagine, and drip back down from it's peak, keeping everything moist and juicy inside. Most recently, I made a tagine of lamb with lemon and olives (Tagine el Lahm Emshmel)- outstanding! The flavor of the lamb comes through, but the combination of saffron, spices, fresh herbs, olives, and lemons come together in perfect harmony, creating a thick, slightly spicy lemony sauce. But I can never resist the first tagine I ever made: lamb tagine with raisins, almonds, and honey (Mrouzia) - this dish is a celebration of Aid el Kebir - the Feast of the Slaughter of the Lamb. The recipe is typically eaten as a side in large feats because it is so rich in sweetness and spices - when I make this, I lessen the amount of honey that goes in, keeping it just sweet enough, but not so much that you can only eat tiny amounts.
So, if you're really feeling ambitious, make a tagine, prep yourself for some serious couscous making, and whip up a batch of delicious Moroccan bread (spiced by a little aniseed - really simple) and you are in for a real treat! All of the following recipes are from Paula Wolfert:
Small-Family Couscous
1 lb couscous
1/4 salad oil
2 T smen (or just regular butter)
1 small whole chicken, plus giblets
1 3/4 t fresh black pepper
1/2 t ground ginger
3 pinches pulverized saffron
1 Spanish onion, thinly sliced
Small bouquet of parsley tied together with thread
1/4 lb large black raisins
1 lb sweet red onions
1/4 sweet butter (I use less)
1 t ground cinnamon
2 t granulated sugar
2 T honey
1/4 lb blanched almonds
Prepare yourself for this recipe, because you'll be working! If you don't have a couscousiere, it is possible to jerry-rig something. If you have a steamer that has a bottom large enough to hold a chicken and some broth, go ahead and use that.

If you have a couscousiere, seal the top and bottom with wet cheesecloth - this ensures that all of the steam from the broth goes right up through the couscous as opposed through the sides. Before you begin, complete the first washing and drying of couscous. To do this, wash the couscous in a large pan by pouring water of the grain in a ratio of 3 parts water to one part grain. Stir quickly with your hands and pour off the excess water through a sieve. Return the grains to a sheet pain and smooth them out - let them sit for 10 to 20 minutes to swell from the water. After about 10 minutes, start to work the grains by lifting up handfuls, rubbing them gently, and letting them fall back onto the pan. Rake the couscous once more to circulate the grains and let swell while you start up your other ingredients.
For the broth, place the oil, smen, chicken, 2 t salt, 1 1/2 t black pepper, 1/4 t ginger, 1 pinch of saffron, and the sliced Spanish onion in the bottom of the couscousiere. Cook gently over low here for 15 minutes, swirling the pot around so nothing burns on the bottom of the pan. Pour in 2 cups of water, add the parsley bundle, cover, and allow to simmer for 1 hour. (This is where the couscous fun comes in!) Place your grains in the top of the couscousiere - I generally put a layer of cheesecloth under the grains, to not only keep them from falling, but also to make the process of removing and replacing the grains from the couscousiere a heck of a lot easier. Place your grains in the top of the couscousiere, and let steam for 20 minutes. Do not put a cover on the couscous while it is steaming!
During this 20 minutes, soak the raisins in water to cover to allow them to plump up. Slice the red onions and place in a heavy bottomed saucepan with a little salt and a little bit of butter. Cook, covered for 10 minutes, add the remaining ginger and pepper, and stir in the cinnamon, sugar, and another pinch of saffron. Continue to cook 15 minutes more, covered, then transfer 3/4 cup of the chicken broth into the onions. Uncover and let this slowly cook and thicken.
For the second drying of the couscous, remove all the couscous from the top of the pan and dump it on a sheetpan, spreading it out with a wooden spoon. Sprinkly 1/2 cup to 1 cup of cold water and 1 t of salt over the grains. Separate and break any lumps by lifting and stirring the grains gently. Finally, oil your hands and get BUSY! This helps really separate the grains. Smooth it out and allow it to dry for at least 10 minutes. If it feels too dry, then add more water by handful sprinkles, and rake well before each addition.

Back to the other pans! Preheat the oven to 450F. Drain the raisins and add them to the onion sauce. When the chicken is tender, remove it from the pan and set in a roasting pan. At this point, the chicken is ULTRA tender - I'm talking, meat falling off the bone tender - so be careful when you're removing it to keep it as intact as possible for presentation. Brush the chicken with a little honey (optional) and place in the oven to glaze. While this is happening, Reduce the onion sauce to a syrupy glaze. While this is cooking, either toast or fry up your almonds in oil and add to the onion glaze.

Complete the final steaming of the couscous. Break up any lumps in the couscous by working it again with your hands, and place the grains back into the top of the couscousiere, allowing it to steam for another 15-20 minutes. By the end of this steaming time, blend together the remaining butter with the saffron and dot the steaming couscous with it - this gives it a beautiful pale yellow color. Dump out the couscous into a LARGE serving dish and toss well so the saffron butter has distributed all over. Spread out and form a well in the center - taste the broth for seasoning, and moisten the grain with it. Place the glazed chicken in the center, and cover with the almond-onion-raisin glaze. Serve at once!


When you taste this couscous it will change your life. The flavors are so complex from the various spices used and slightly sweet from the glazed onions, which also makes it extra savory; the chicken is extra moist and plumped up from the delicious broth it was cooked in, and the couscous itself is just to die for. The grains are packed with flavor, not to mention beautiful looking, and when you eat it, you can almost taste every little individual grain. I am salivating right now. And yes, it takes some time management, but the end result is more than worth it.
Mrouzia - Lamb with Raisins, Almonds, Honey
3 lb lamb stew
Salt to taste
1 1/2 t ras el hanout
1/4 t ground ginger
1/2 t fresh black pepper
Pinch of pulverized saffron
1 3/4 cups blanched, whole almonds
2 cloves garlic, peeled and minced
3 small cinnamon sticks
1/2 cup butter or oil (I use alot less)
1 lb raisins
3/4 cup dark honey (I use less as well)
1 t ground cinnamon
Place the lamb in the casserole (or bottom of tagine if you have one). Mix the salt, ras el hanout, ginger, pepper, and saffron with 1 c water and rub into each piece of meat. Add the almonds, garlic, cinnamon sticks, butter or oil, and 2 cups water. Bring this mixture to a boil, lower the heat, cover, and simmer for 1 1/2 hours. Add more water if necessary so as not to burn the meat.

Add the raisins, honey, and ground cinnamon and continue to cook 30 more minutes. Finally, uncover the casserole, and over high heat, reduce the sauce, turning the meat and fruit often so it doesn't burn, until there is only a thick glaze coating the fruit.

This dish is crazy - I would never think of such sweet additions to lamb, but the flavor combination, again, is crazy delicious! The meat, being simmered in the mixture for so long, because tender and just falls apart with the touch of a fork. The almonds are soft - almost al dente really - and give the dish a nice toothsome quality. It's not overly sweet or heavy either, if you reduce the amount of honey added - this again is the perfect play of savory/sweet that the Moroccans seemed to have perfected. Note, if you're going to do both the tagine and couscous for the same meal, start this first since it takes about 30 minutes longer and you don't have to keep too close of an eye on it!
And finally:
Tagine el Lahm Emshmel - Lamb with Lemon and Olives
3 lbs lamb stew
Pinch of pulverized saffron1/4 t turmeric
1 t ground ginger
1 t sharp paprika
1/2 t fresh black pepper
1/4 t ground cumin
Salt to taste
1/4 salad oil
1/2 cup grated onion
1/4 cup finely chopped fresh herbs (mix parsley and cilantro)
2 cups finely minced onion
1 cup green-ripe olives (I used Castelvetrano - DELICIOUS!)
2 preserved lemons, quartered and rinsed
Juice of 1 lemon
1 t tomato paste
Soak the crushed saffron in a little hot water in the bottom of the casserole or tagine. Add the spices, salt, oil and grated onion, then toss the pieces of lamb in the mixture. Saute very gently to release the spices aromas and lightly sear the meat. Add 1 cup water and bring to a boil. Cover and cook over low heat for 1 hour, adding water if necessary.


After one hour, add the herbs and 2 cups minced onion. Recover and simmer until the meat is very tender and the sauce is thick. While the lamb is cooking, rinse and pit the olives. My olives kept getting smushed so I opted not to pit them for presentation. Remove and discard the pulp of the preserved lemon, rinse, roughly chop, and set aside. Ten minutes before serving, add the lemon juice, olives, and lemon peel to the tagine and mix. Transfer the meat to a deep serving dish to keep warm. Add in the tomato paste and stir. Turn the heat up to high, and reduce the sauce to about 1 1/2 cups and taste for seasoning. Mix and finally pour the sauce over the lamb and enjoy!

You really can't go wrong with any of these dishes - the flavors are just incredible, and the meat always turns out perfectly cooked and tender. I highly recommend trying at least one of these! There are still a ton of recipes in the book that I want to try, but the dishes I've made are so good it's sometimes hard to stray away! Next stop, fish or vegetable tagines - maybe brain salad? Well, maybe not. If you're really up for it, be sure to make some of this Moroccan bread as well - it's perfect to sop up any remaining sauce from the tagines or cous cous!
Kisra - Moroccan Bread
1 package active dry yeast
1 t granulated sugar
3 1/2 cups unbleached flour
1 cup whole wheat flour
2 t salt
1/2 cup lukewarm milk
1 t sesame seeds
1 T aniseed
Cornmeal
Soften the yeast in 1/4 cup sugared lukewarm water. Let stand for two minutes, stir, and set in a warm space until the yeast is bubbly and doubles in volume. Meanwhile, sift together the flours in a large mixing bowl. Stir the bubbling yeast into the flour, then add the milk and enough lukewarm water to form a stiff dough. Turn the dough out onto a lightly floured surface and knead hard with closed fists, adding water if necessary. If you are kneading with your fists, do so for about 10-15 minutes to achieve a smooth, elastic consistency. You could use a mixed with a dough hook, and that would take a bit less time. During the final part of the kneading, add the seeds. Form into two balls and let stand for 5 minutes.
Lightly grease a mixing bowl. Transfer the first ball of dough to the bowl and form acone shape by rotating the dough against the sides of the bowl. Turn out onto a baking sheet sprinkled with cornmeal, flatten the cone to form a disc about 5 in in diameter with a slightly raised center. Repeat with the remaining dough. Cover lossley with a damn towel and let rise about 2 hours in a warm place. The dough is ready when it doesn't spring back when you poke it with your finger.

Preheat the oven to 400F. With a fork, prick the bread around the sides four or five times, then place in the center rack of the oven. Bake for 12 minutes, then lower the heat to 300 and bake for about 30-40 minutes more. The bread is done when it sounds hollow when you tap the bottom. Remove, let cool, and cut into wedges just before serving.
All I can say is YUM.
Comments